  |
 |
|
Anchoring Techniques
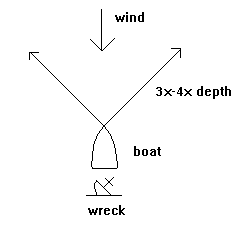
It's no big secret these days that the fishing just isn't getting any better. After years of overfishing, many species have reached all-time lows, and many stocks may never recover. As a result, many fishermen have had to turn away from the convetional trolling for bluefish and drifting for fluke that they have done most of their life. With the success of loran and new precision of gps, many anglers have turned to wreck fishing for sea bass and tog (blackfish) as a viable alternative. So there you are; your buddy gave you some great wreck numbers, you've got your bait, and the forecast checks out. However, the singlemost important factor in successful wreckfishing is getting set up over your structure. Here are three different techniques for successful anchoring. The GrappleUse of the grapple is one of the easiest ways to anchor over a piece of structure. However, it has some limitations. First, it is only good on relatively calm days. Because the grapple is hooked directly into the structure you want to be over, you have no scope in the line. On a rough day, using a grapple will either beat your brains out or sink the boat. Second, the size of your boat needs to be taken into consideration. The grapple is most effective on boats up to about 30 feet in length. It can be used on larger boats, but it must be an absolutely calm day. So, if you plan on wrecking from a larger boat, look into one of the other techniques. Ok, you've decided to use your grapple and you've got the wreck marked. Now what? Well, if it is a day with no wind, position the boat right on top of the wreck and drop the grapple. Allow it to hit bottom, and then begin bouncing it off the bottom; you should be able to feel it bouncing off the structure below. Once it grabs, tie it off to a cleat, but be sure to make several figure eights before securing with two half-hitches. The strain of the grapple will pull the hitches extremely tight and they will become difficult to get out if you don't. If it is a day with some wind, position yourself slightly upwind before letting the grapple down. This will allow the anchor to reach bottom before drifting back into the wreck. Be prepared for the line to come tight and tie it off to a cleat as described above. The grapple allows you a little flexibility in moving around to fish various parts of the wreck. However, you will never be able to fish the upwind side of where the grapple is hooked into the wreck nor will you have much side to side movement. When you have caught dinner (Leave some for me, please!!), first try to let the grapple go slack and the grapple should hopefully fall free from the wreck. If not, make sure the line is tied off to a thru-bolted cleat or eye. (I've seen cleats pulled out.) Head upwind and, depending on the type of grapple you are using, the arms will straighten or the hook will pull out backwards. Bridling With Two AnchorsThis is the undisputable champ when it comes to anchoring over a wreck. However, many people don't want to invest in two anchors or the line needed to lay two anchors. If you can, I recommend this technique over all others. In order to lay two anchors, pull up to your marker and allow the boat to drift about 50 yards with the wind and current; head back to the marker, noting the compass heading. When you reach the marker, turn about 45 degrees to port. Travel about three to four times the depth of the water and drop the first anchor. Now, turn the boat and head back to the marker, being careful not to run the anchor line over. Once you have reached the marker, head about 45 degrees to starboard from the initial compass course that you wrote down, still paying out line on the other anchor. Travel another three to four times the water depth and drop the second anchor. 
Now for the tricky part: head back to the marker, paying out line on the second anchor and taking in on the first. When you get back to the marker, come tight on both lines and you should be right on top of the wreck. Laying two anchors has several advantages. First, by taking in on one line and letting out on another you can adjust for wind and current changes. Second, you can move to different parts of the wreck, especially if it is a large wreck. If you are looking for mr. tog, you know you have to be right on top of him to catch him. Sometimes getting over his favorite hole is the solution to an empty box. When you are ready to leave, simply take in on one line as you let out on the other. Once you've retrieved one anchor, head straight for the other. While this is the best anchoring technique, it is not always most practical because of the large amounts of anchor rope neccessary to accomplish laying both anchors. Also, it involves pulling a lot of anchor line, so some type of capstan is almost a neccessity if you plan to do any amount of wrecking. The Single Anchor, With A TwistHaving a single anchor on board is more common than having two. Laying a single hook is no big deal and requires less anchor line. Once you've marked the wreck, head back to the marker and let yourself drift away from the marker. Head back to the marker, noting the compass heading. Continue past the marker about three times the water depth. Drop the anchor and power back to the marker, and tie the anchor off. If you are extremely good, or as is probably the case, extremely lucky, you will be set up right on top of the wreck. 
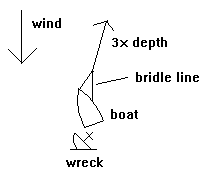
I can remember very few days when I've been that "good". It's hard to judge the wind and current to lay the anchor directly into both. Many times, it is neccesary to come back on the anchor, note the compass to see what direction you are laying, and then re-anchor using this new compass heading. However, if you aren't that far away, there is a solution: it's called a bridling line. A bridling line is somewhat similar to using two anchors. Here's how it works: once the anchor is layed, you are headed directly into the wind and current. If you turn the nose of the boat so that it is at an angle to the wind, the boat is pushed in that direction. If you don't believe me, try this: the next time your driving down the highway, roll down your window and stick your hand out with fingers together. (Make sure no cars are coming or are passing!) Tilt your hand slightly and then turn it a little; you'll feel the force of the wind pushing it. How do you turn the nose of the boat? Here's how. Let out enough line so that you are just behind the marker. Now, power forward about twenty feet and take a second line, about fifty feet in length, and attach it to the anchor line with a bowline. Tie this bridling line off to a spring line cleat opposite the side of the wreck (If the wreck is to port, tie it on the starboard side.), and the boat will angle itself towards the wreck. Adjust the lengths of both lines to get yourself positioned correctly. This method offers the versatility of two anchors while using only one anchor. While I would be lying if I told you this method requires no practice, with a little experience you can master the technique of using a bridling line. |
|
Home | About The Vessel | About The Captain | Policies & Rates | Fishing Report Image Gallery | Species Guide | How-To Articles | Color Brochure | Contact Info & Directions Join E-Mail List | Issues in Fisheries Management | Affiliations / Links ©Copyright 2003 - 2024 Karen Ann Charters LLC - All Rights Reserved |
|
||||